Lightroom is the go-to editing tool for most of today’s professional photographers, so I thought I would do a quick tutorial on how to use Lightrooms new colour grading tool.
You may find the following video useful if you would like to follow along with the whole editing process. Useful if you’re using the Colour Grading Tool for the first time.
I have other tutorials too! Such as How to Fix Highlights and Shadows and How to Focus Stack in Lightroom and Photoshop.
Recently, I have been paying a lot more attention as to how the colours look on my photos and working hard to get my Instagram grid to reflect the seasons, as most of the photos I post are of the outdoors, landscapes, or family trips etc.
As a result, there is a definite shift in the colours of the grid as the season moves. As you can see, if you head over to my Instagram Account, we are definitely getting an Autumn vibe!
Don’t forget to head over there to follow me to see how that develops.
First Impressions of the new colour grading tool
As a result of this, the new lightroom Colour Grading release was of particular interest to me. Released on I think the 20th October I upgraded a day or so later.
My first impressions of the new tool, which has replaced the old Split Toning option, was that it looks a bit daunting. It mirrors the colour grading tool found in Adobe Premier Pro, which, to date I have steered well clear of.
Split Toning used to give you the option to adjust the colours in the shadows and highlights to give you your unique look, whatever that may be.
Colour grading goes one step further, taking the idea and the colour wheels from Premier Pro, and allowing you to adjust the colours in not only the shadows, and highlights, but the mid-tones as well.


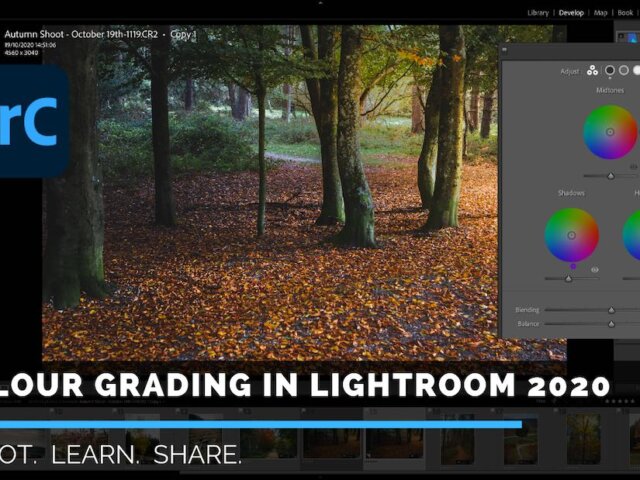
You will see that the Colour Grading section has replaced the Split Toning section in Lightroom

Instead of just having sliders to control the Hue and Saturation, you now have these wheels.
Looking at the Colour Grading section, you have 5 options along the top.
You have the option here of working on all three at the same time, or, you can click independently on the highlights, shadows and mid-tones which gives you a bigger wheel to play with.
So how does the Wheel actually work?

You have a small circle in the middle of the wheel, which determines the saturation of the colours. Slide the circle to the outside for full saturation. Leave in the middle for less.
On the outside, you have a small dot that you can spin around to get the exact colour or hue you want.
I usually turn the saturation right up, spin the wheel to find the right tone. Then click back on the circle to dial the saturation back to get the look I need.
As soon as you click on the circle, it kind of locks into place, giving you a line to slide up and down.
This means the Hue doesn’t change, as it freely slides along the line of your chosen colour.
However, a faster movement will take it off the line, so be careful there. This is better explained in the video above.
Once you make an adjustment in the colour grading section, you will see these little dots appear under each of the circles at the top. This indicates the area actually has an adjustment made.

Clicking and holding the little eyeball, gives you a with and without view of the adjustment you have just made.
If you are more of a slider person, then you can just click this drop-down arrow. This takes you back to the good old days of the traditional sliders. Which, as you slide, you can see the wheel turn.
You also have Luminance slider which adjusts the brightness of the colour, within the area. Whether that be Shadows, Highlights or mid-tones, that you are working on.
What about the Blending and Balance Sliders?
Moving down, you have the Blending slider. This controls the blend or the gradient if you like, of the shadows and highlights. I am just going to make the HL and Shad 100 in opposite colours to demonstrate this.
100 and you can see a distinct blend between the shadows and highlights. As you slide that down, the colours and the mix becomes a little more subtle. This is clearly oversaturated and edited like this just to show the difference. The Shadows on the left side vs the brighter areas, the highlights on the right. Colour grading in Lightroom definitely needs to be a subtle exercise!

The Balance slider affects which you want to be more dominant. Move left, and the tone for the shadows dominate, move right, for the highlights to dominate
Now again, we have exaggerated this with extreme colours, at 100, which wouldn’t happen in the real world, but this was just to prove a point.


Finally, if you mess it up, and want to start any of it again, you can just double click on the individual option, to reset that option, or make sure you are on the option with 3 wheels, and just double click Adjust to start over.
Summary – How to use Lightrooms new colour grading tool
And that is the new colour grading tool from lightroom
Initially, it could be a bit daunting. But if broken down, you can see that it is quite simple, and if used tactfully, you can get the exact look to your images that you want.
I think the only thing missing here is the ability to save a ‘Preset’, a bit like you can in the tone curves.
But, perhaps that will come in another release.
Things like this by the way, are where the subscription service really comes into its own. £9 a month here in the UK and you get these upgrades for both LR and Ps. I know a lot of people are against paying this way. But I think this for £100 a year, you get LR, PS, all the upgrades as soon as they happen.
The old days it used to be several hundred pounds, and you were stuck with what you had until you paid again for a new release.
So there we are, thank you for reading. Don’t forget to check out the video for a run though of all the features.
Like, Share and subscribe for more videos, and leave me a comment below to let me know what you think of the new Colour Grading in Lightroom.
So that’s it, until the next post, see you later.