Lightroom Tethering is one of the great features of Adobe’s go to editing software.
I recently did a video on taking self-portrait type photos and came across an issue. Being able to compose the photo, and also get the focusing point in the exact spot I wanted to was a challenge.
That prompted me to investigate using Lightroom tethering, and the ability to operate the camera, focus and pose at the same time.
Here’s the video I did, if you’d prefer to watch.
What is “Tethering” and why is it useful
Tethering is where you connect your camera to your computer using its USB lead. The view from the camera is transferred to the computer screen.
Why would you want to do this? Well, perhaps, like me, you were trying to compose a photo of yourself. Tough, if your camera, like mine, doesn’t have a flip-out screen.
Perhaps whatever you were shooting needed to be viewed on a big screen, so you can check the quality or you are in a studio with a model, and you want to instantly view the photos together.

Any of these reasons are justification enough to plug into the computer and utilise the Lightroom tethering option.
Camera Set up and Connection
Your camera should come with a USB lead to connect the body to the computer. This bit is very simple, you must plug on end into the camera, and the USB end into the computer.

There are quite a few cables out there, and a lot of cameras have a different connection.
The Canon 1DX mk2 which takes the USB 3 Micro B cable
The Canon 5D mk 3 which takes the USB Mini A
The Sony which takes the USB Mini B.
I think!!
There are so many cables. I apologies now if I have got the name of these wrong.
So, that is the camera connected to the computer, we are now going to jump into lightroom and do what we need to do in there.
Opening Lightroom, setting up the camera and tethered capture settings
So here we are in lightroom, and there are a few things to do before you can start shooting.
Click on File > Tethered Capture > Start Tethered Capture
The Tethered Capture Setting window appears, and you have a few options.
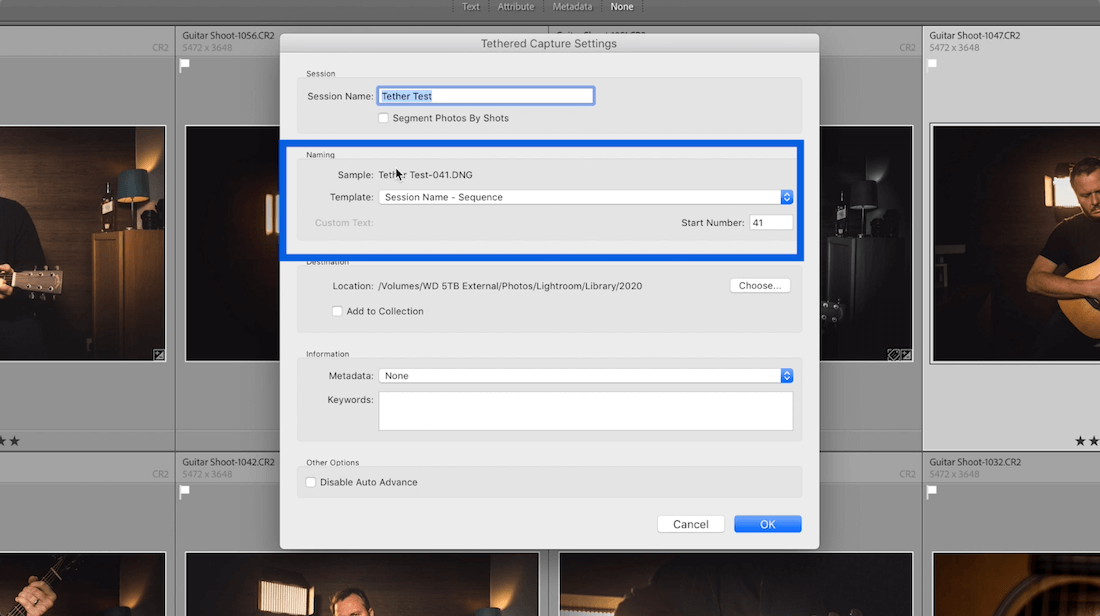
I am going to talk about the Naming section first, as the other sections are kind of connected.
The Naming area is what the files will be called when they are saved to your hard drive.
I think I would probably use Session name and sequence, as it is then clear what the images are for.
There are various options here and you can always rename them afterwards. If you want a more detailed tutorial on renaming photos, then check out this post, How to Rename Photos in Lightroom.
The Session Name is not only the name of what you want to call the Session, but it also makes a folder on your hard drive in whatever directory you choose in the next section, the Destination.

Take a few seconds here, because if you think ahead, you can shoot, and get the images on the correct place on your hard drive, and into your lightroom catalogue all in one go.
I choose to set up and save them directly into the master library where all my Lightroom Photos are stored. This way when the shoot is finished, all the photos are exactly where I want them to be
You can go a step further. Let’s say you have someone with Lightroom synced on you iPad to your Adobe Login. You can also pick the box Add to Collection, and if you choose a Lightroom Mobile collection, the image will also go to your iPad (assuming you have a Network of course)
Ain’t technology grand!!
Disabling Auto-advance in Lightroom Tethering.
The Information section is pretty self-explanatory, you can add your specific Metadata for copyright, and you can add keywords to the images as they import. Pretty similar to the option when you do a normal import
As a standard, the image that appears on the main lightroom screen is the one you have just taken. So if someone is still looking at the previous one, it will jump to the next one if one is taken.
Check this box if you think you may have someone reviewing the photos, while others are being taken. Then, Lightroom won’t jump to the most recent one while someone is still reviewing an old one.
If that makes sense? Try it, youll see what I mean.
Moving on…hit ok to start the tethering session
Now, if your camera is not connected, or not turned on, you will get this message.

Just make sure it is connected, or turn the camera on and this will disappear
You will then see this little control panel pop up, allowing you to take control of the camera if you want to.
Ignore this if you are shooting from your camera. Just take the shots, enjoy the creative process, and watch your works of art pop up on the screen.
The Lightroom Tethering control panel
If however, you want to control the camera from the computer, as I did in a recent shoot I did of myself, then this is how.

The first thing you need to do is to click the LIVE button. This gives you this little green light, and you see on the computer what your camera is seeing.
This does seem to make the controls on the camera redundant, as everything now needs to be adjusted on the computer.
I tend to position the little control bar just above the thumbnails, and the LIVE view screen above this. It means you can still see the thumbnails, the control bar and the live view screen.
If you want to analyse the photo as it comes in, just minimise the live view screen. You could of course just make the live view screen a bit smaller and be able to see all three.
You have the option of adjusting the Shutter, ISO, White Balance etc here. Any changes you make are reflected on the screen.
You can also apply a preset if you wish as the image imports.
There is no easy way to focus though. There is no double click feature like you find on the EOS utility app, and you have to use these little arrows

It is not ideal. I think there is a bit of development needed there if you want to actually shoot something from the computer with varying focal points.
Adjusting the settings if necessary
If, at the start, you have realised a setting is wrong, then clicking on this little cog brings up the Capture settings you set up at the start. In case you need to change something. Perhaps tick that Auto Advance box.

And this big grey button does exactly what you think it does, it fires the shutter. You can also fire the shutter by pressing the function button and F12 on a Mac or just F12 on a normal keyboard.
And…that is basically that. It is simple to use, the only time I have lost connection is when the camera has gone to sleep, but a quick press of a button on the camera and it soon wakes up, and connects again.
That’s it, then end.
Thanks for watching, don’t forget to head over to the YouTube channel for more videos, and I look forward to seeing you next time.