Lightroom is an amazing friend for Photographers. In this tutorial, I am going to quickly explain a quick way of Fixing Highlights and Shadows in Lightroom.
Fancy a video walk through, and seeing me play a guitar….badly?
Check out the video.
If you’d rather follow with good old fashioned word and pictures…then here you go.
Let’s say you have an image that has bright whites and dark darks, like the below.

The bright sun, the dark coat. This looks ok, thanks to Lightroom.
But, thanks to the range of darks and lights, many camera could struggle.
Fixing Highlights and Shadows in Lightroom
Head up to the Histogram, which should be top right of your Lightroom window, and it looks like this.

Above the Histogram, to the left and right, you can see the small arrows.

Click on them as indicated with the arrows, and it will show you in your image, all the areas that are either too dark (Blue = Shadows Clipped) or too bright (Red = Highlights Clipped)

You can now set about adjusting various things. in the basic edits panel to reduce these extreme.
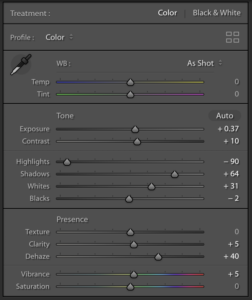
The simplest things to adjust are the Highlights and Whites (to reduce the highlights) and the Shadows and Blacks (to reduce the Shadows).
After a bit of tweaking, you can make certain adjustments to ensure there is still detail in the brights and darks.
This is the photo I have been left with. I have kept a couple of of the Blue and Red highlights so you can see the difference.

So that is it. A quick and simple tutorial on how Fixing Highlights and Shadows in Lightroom can be really easy.
Hope you have found it useful. Follow the YouTube channel and / or, sign up for more post from this blog using the newsletter if you want more simple tips, trick and advice about all things photography.