Lightroom Adaptive Presets were made available in the October 2022 release of Lightroom Classic.
It simply gives you the ability to select certain parts of your photograph and edit that part only.
This can be particularly useful for Portraits. As you may know, Lightroom Classic does have its own Presets for certain facial features, but I would prefer to create and use my own, and this article is going to show you exactly how to do that.
Lightroom Adaptive Presets – What are they exactly?
Lightroom Adaptive Presets are presets that adapt to the photo they are applied to.
For example, (and as you are about to see) if you apply an adaptive preset that is set to brighten the background, the AI in Lightroom will search for what it deems to be the background in your chosen image and apply the settings you saved to the Background Mask.
This Lightroom Tutorial will show you how to create Adaptive Presets in Lightroom Classic, specifically for Portraits, that will speed up your workflow and give you consistent results over a batch of photos if needed.
Let’s begin!!
Lightroom Adaptive Presets – The Video!
Lots more videos over on my YouTube Channel
Step 1 – Apply The Masks
Firstly, we are going to apply masks to the background and the face, but with no edits. You can save this as an Adaptive Preset for applying it to any image.
To start, on your photo, click the Mask option, and select Background. Tick the Show Overlay option to see what has been highlighted. That is the background mask created.

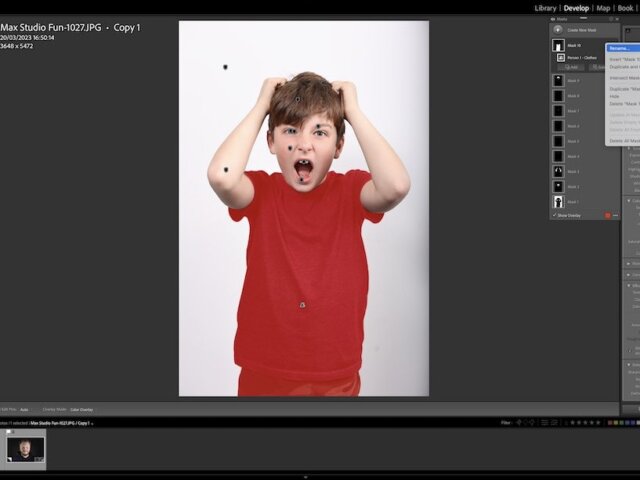
Now, we want to create a mask for the Person Features.
At the top, click on Create New Mask, and Lightroom should give you lots of different options. Click on the Select People option.

Lightroom will detect people, and when you see the face of the person in the photo, click on this. it will then detect the person features, and you need to untick the Entire Person option, and individually tick all the Feature Options.
Make sure the Create Separate Masks is checked, and click Create Mask

To set this up initially, make sure you are using a portrait of someone smiling and showing their teeth, otherwise, Lightroom will not offer you the Select Teeth option.
In fact, if you want to be super thorough, you should use a subject that is smiling, with a beard for example, so you get the facial hair option too.
For this example, I am going to continue without the facial hair option
Step 2 – Rename the Masks
This section is optional as if you click on each mask, you can see what the mask refers to. However, I prefer to rename it at the top level, so you can see without clicking. To do this, expand Mask 10, right-click, and rename Mask 10 to match what it says next to Person 1, in this case, Clothes.

Repeat for all your masks.
You can now see it is really easy to identify the part of the person’s feature you want to edit. Click the Mask option again to close this small window.

Step Three – Save this as a Preset
We are now going to Save this as it is, and yes, there are no edits on any of these masks, and that is for a very good reason which will become clear soon.
To Save this as a preset, click on the small Plus sign on the left-hand side, and choose Create Presets.

I am going to name the Preset Background and Face – 0.
You should save this in its own group to make it easy for you to find among all your other Presets. In this dropdown box, click on New Group. I am going to name it Adaptive Portraits.
Then, at the bottom, click on Check None. Next, Click the Masking check box so all you have is the Masking options saving.

This means that when I use this Preset on another image, nothing will happen. It will apply only to the mask, but it will apply it at the edits I saved, in this case, zero. It is a one-click solution, rather than doing them all individually as we did at the start.
Step Four – Save Separate Areas with Edits
You could quite easily leave it there, and just apply that preset to all your portraits, and edit them individually. But, you could also apply small or large changes to those attributes, to apply to future photos.
Just the Background
Why not create a preset that gives you a white background with just the click of a button?
Create the Background Mask as explained above. Then, adjust the Exposure, whites, saturation etc to give you a perfect white background.
Save as a new preset, called “Background Pure White Face Zero”
A quick tip, if you want to make sure the background, or any white, is actually white, Right Mouse click on the Histogram and ensure the Show Values as Percentages is not ticked. This will give you the RGB values. 255, 255, 255 is pure white.
With the mouse, hover over part of your image, and see what the values are.
Just the Face
Perhaps you have a portrait that doesn’t need a blanket fix on the background, so you just want to use the facial features with minor tweaks.
Bear in mind this is subjective, and just because any edits look good on the photo you are working on now, does not mean it will work on the next. But, if you have a whole batch of photos taken in the same lighting, then this could work. Or, make the adjustments so subtle, then it will be a great starting point for any photo.
Create all the People masks as explained earlier. Then maybe add small, ‘starter’ adjustments to whiten eyes and teeth, brighten shadows etc.
Save this as a preset, perhaps called Background 0 Face Minor.
You apply this preset to the next photos, and it could give you a great starting point with one click.
Lightroom Adaptive Presets Recap
So, let me quickly summarise what we have done.
We have potentially created 3 presets –
- Background and Face 0
This just applies the masks to the Background and Person Features. No edits are applied, they are just there with one click so you can edit them individually - Background Pure White and Face Zero
This is perfect for fixing a white background on a batch of studio photos. Apply to all, or one at a time. Instant White Background. - Background 0 Face Minor
This applies mild adjustments to certain parts of the face. I don’t touch the background, and I make only mild adjustments to the face, which can be easily reversed.
The possibilities with this are endless, and you could easily create a string of presets, each with incremental adjustments adding more aggressive settings to each one. (Eyes 1, Eyes 2, Eyes 3) with Eyes 1 being minor, and Eyes 3 having a heavier edit.
Or Skin 1, Skin 2, Skin 3.
Skin 1 is very minor smoothing, and Skin 3 turns your granny into 25 year old.
Summary
The point of this is to be subtle with your edits, and your saved Presets.
You will never get on preset to match every situation, but, if doing this can give you a better starting point, and save you time, then in my opinion that is well worth the effort in the long run.