Organising and Managing your Photos in Lightroom Classic
Lightroom has become an essential part of many photographers workflow, including mine. Therefore, organising and managing your photos in Lightroom is key.
Making sure you can easily catalogue, search (and find!) the photos you ant, when you want them is important.
Up until recently, my Lightroom organisation was a little, shall we say, haphazard. I didn’t really have a process, things were just organised by date, and the ones I liked were flagged.
2021 is going to change that. This is the year I start to organise my photos in Lightroom, and make myself more efficient.
So, I though I would share with you, what I am going to do, so let’s get into it.
If you would prefer, don’t forget you can also watch the video tutorial on my YouTube channel
If you would prefer to follow along here, then let’s get into it.
Where do you store your photos?
This is the first thing to consider is where you are going to store your photos. This is really important for now, but also for the future and years to come. Do you have a lot of storage space on your computer’s hard drive? Are you planning on shooting in RAW (larger file sizes)? If so, then the space you have can be consumed very easily, and before you know it, you are out of space. Back ups are failing, and you have to revisit the whole process again.
Because of this, I have chosen to store my photos on an External Hard Drive. This external Hard Drive backs up using Time Machine and is seamless (almost). You can also choose to back up to the cloud. Again, this will help with actual Hard Drive storage, but more on backing up later.
Another advantage to backing up to an External Hard Drive, is also worth considering. If you ever replace your computer, then the bulk of your data will be on a stand alone drive. This means, there is less to migrate to your new computer.
Folder Structure
There is no right or wrong answer to this, and it really comes down to personal preference. The type of photography I do for work does not require a lot of editing. As a result these are kept ring fenced on other Hard Drives.
Lightroom is used for organising my personal project, trips and family events. This is not to say I don’t use it intensively. My Lightroom catalogue currently consists of over 42,000 images. As a result, sorting by Year and Event works well for me.
If you are using Lightroom for clients, then perhaps you would sort by Client. Or by Genre (Wedding, Portraits, Products etc).
On my External Hard Drive, I have the following structure.
External Hard Drive > Photos > Lightroom > Library > YYYY > Event Name
The important thing here is to give it some thought. Make sure it works for you, and is future proof. Getting this right is key to Organising and Managing your Photos in Lightroom effectively.

The Lightroom Catalog
The Lightroom Catalog should not be confused with the ‘Catalog’ or Library where your photos are stored. I did a bit of research and this excerpt from the Adobe website explains it best:
“A catalog is a database that stores a record for each of your photos. This record contains three key pieces of information about each photo”
They are, as follows
- A reference to where the photo is on your system. So it basically links to the image you have saved on your Hard Drive. It provides a Preview of that image.
- Instructions for how you want to process the photo
- Metadata, such as dates, keywords and edits. Along with things you may add to help organise and locate them at a later date
As photos are added to Lightroom, a link is created to the original. You do not actually import a new image into Lightroom. You are basically asking Lightroom to look in a certain location, and pull back what it sees.
As you edit the photo, then in the catalogue, and on the Preview of the image, it adds these adjustments. The original image on the hard drive is untouched. Lightroom is non destructive. This means the edits are only done on the preview in the Lightroom Catalog. These edits are saved only when you export the image as a new photo. The original remains intact, in the origin location.
People are tempted to create more than one Catalog. Perhaps one for 2018, one for 2019 etc. I would strongly advise against this. You can only have one catalog open at a time. If you wanted to compare images across two catalogs, you can’t.
As mentioned, I have over 42,000 images in my catalogue. With the right organisation, this is a fully manageable number.
Adding Existing Photos to Lightroom
If you are new to Lightroom, then chances are you have a number of photos ready to import. The could be on your computer or Hard Drive, or whoever you are choosing to store them.
The process of getting these into Lightroom is pretty straight forward.
Make sure you are in the Library Module, and click on Import. The Import Dialogue box will pop up.
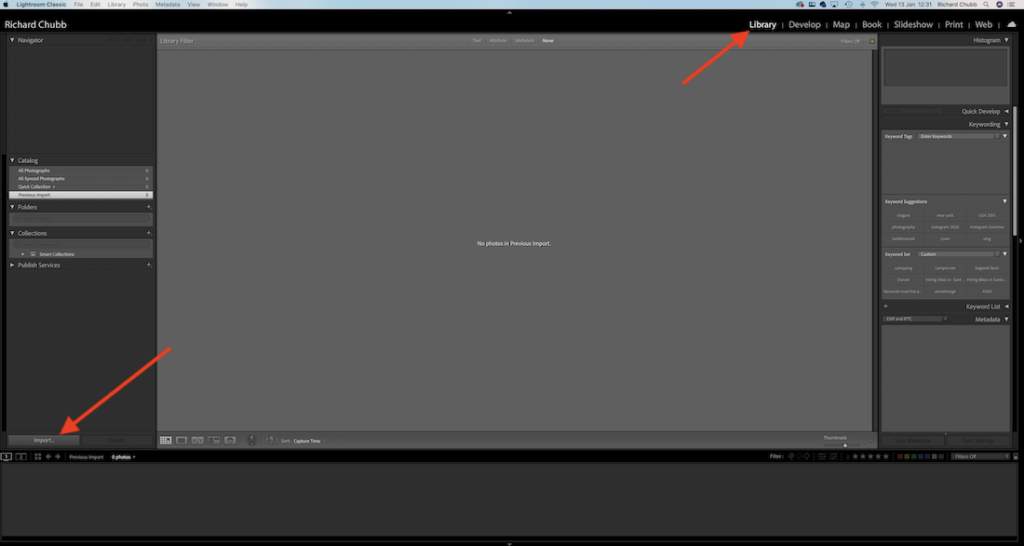
You will then be shown a screen where Lightroom recognises the locations you can import photos from. This will include internal hard drives, external hard drives, attach memory cards etc.
You should have already determined which location you are storing your photos in earlier, so you can just navigate to this location.
Click on the top folder you want to import, and as this is the first import, make sure All Photos is selected. The folder structure underneath your selected folder will import, and include all the photos in those folders.
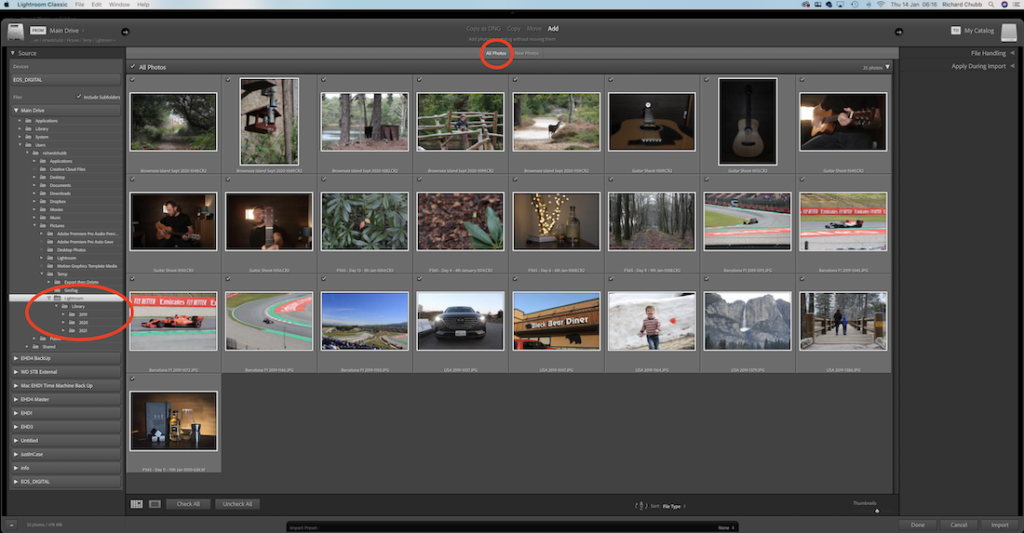
Once done, click on the Import button in the bottom right hand corner. The chosen folders will then import, and mirror the folders structure where the photos are stored.
You can see here, the Folders in Lightroom match the Folders on the hard drive.


Adding new photos to your Lightroom Catalog
So you have been out on a shoot, and you have a memory card full of new photos you need to get into Lightroom. There are a couple of ways you can do this. I will show you the way I think is best.
If you want more information, you can check out this video over on my YouTube channel, but this is the best way I have found.
I am suggesting this way for now, as it completes a lot of tasks in one go, as follows:
- Creates the new folder on your computer’s hard drive
- Adds the Photos to your Hard Drive and Library in one go
- It renames the photos (if desired) as they import
- You can apply Copyright, Keywords etc at the same time
I will be publishing a more detailed post on this in due course.
Importing
Click on Import again, and take a look down the left hand side. You should see the memory card you have connected to your computer. Click on this, (1) and your images should appear. If it shows no photos, then you may need to click on the option to Include Subfolders.
Down the right hand side, are your import options. Most of these will be covered in another blog post, but for now, expand the Destination section, and navigate to where you want to save the new photos (2). Make sure you are on the folder you want the new Folder containing your new photos to appear in.
Tick the Into Subfolder box, and type in the name of the new folder name (3). You will then see this appear in Italics within the folder you clicked on above (4). If you chose to, you can all use the File Renaming section to rename the photos as well.
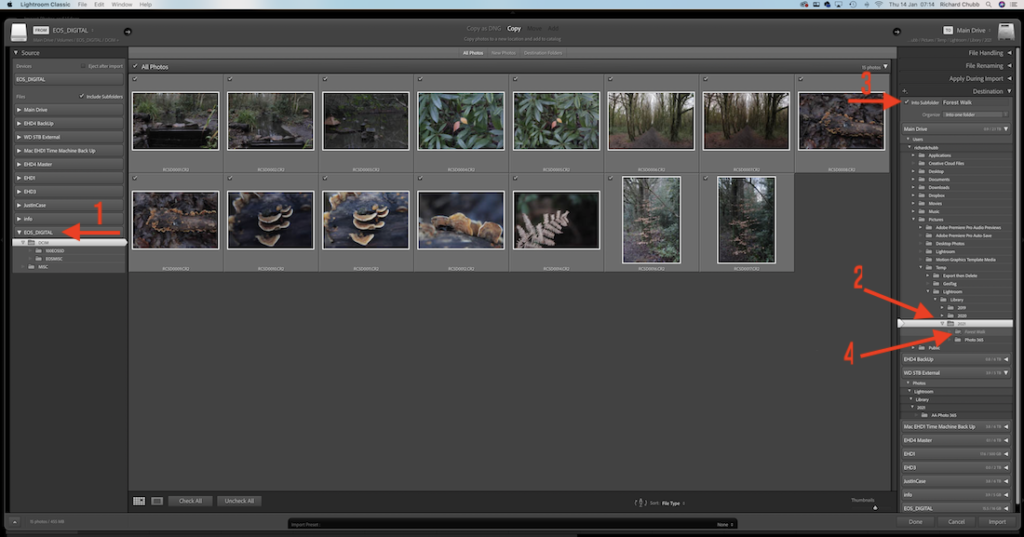
Click on Import, in the bottom right hand corner, and this will create the new folder on your actual hard drive / computer. It will add the new photos to that folder, renaming them, and importing them into you Lightroom catalog at the same time.
Once this process has completed, you should see, down the Left Hand side of your Library module, the new folder, with all the images in.

Getting them into Lightroom is only half the job. As your library increases, so does the need to ensure you can categorise them, pick your favourites and find them again at a later date.
Organising and Managing your Photos in Lightroom
Lightroom has some amazing tools and options to enable you to organise and categorise your photos. Everyone has their own way of doing this, so it would be remiss of me to suggest my way. What I will do is show you the basic tools that are available, and you can chose the way that suits you.
Flagging Photos
Using Flags, you can easily apply Pick and Reject Photos you like or dislike, just by Flagging them. You can either Right mouse click on the photos, and Set Flag or use your keyboard. I chose the keyboard as it is far quicker to work through a lot of photos
- P = Pick
- X = Reject
- U = Clear Flag
For me
- Pick = Ones I like
- Reject = Ones that are fundamentally bad (Blurry, Bad Exposure, Unusable, Duplicates)
- No Flag = Average photos
Here, you can clearly see the one that have been picked or rejected, and you can filter on each category by clicking on the filter option at the bottom.

Using the Flags are my first choice of Rating when I get new photos into Lightroom.
It is basically, a Yes or No, as to whether I think the photo has potential.
Star Ratings
Star Ratings are quite obvious, and you can rate your photos from zero stars, to 5 stars. Again, you can either right mouse click and choose Set Rating or you can simply hit the number on your keyboard. 1 for one star. 2 for 2 star etc. I don’t think I need to keep going?
Again, you can filter on your Star Rating, to only show 5 star photos, etc.
Strangely, I don’t really use Star ratings that much, but it is something I may start using in 2021, and I try and improve my Lightroom organisation.
The only thing I use stars for is the following. If I take a great trip somewhere, perhaps a family holiday, and manage to get some photos I think are worthy, I will star as follows.
3 Stars for the nice family ones that I want to add to a family album somewhere.
5 Stars for one I want to share in my Portfolio.
We went to California in 2019, and I took loads of photos I want to keep for memory, for family holiday snaps. But, I also took a few photos in stunning locations I was proud out, and wanted to share with the world.
The 3 and 5 stars differenciated these.
Colours
You can also use colours for organising and managing your Photos in Lightroom. Again, I don’t use these extensively, but this is how you use them.
Right mouse click the photo, and select Set Colour Label. Here you can see all the colours you can choose.

You can use the keyboard, numbers 6, 7, 8 or 9 for Red, Yellow, Green or Blue. Purple doesn’t have a number, so you will need to use the mouse.
One other area that I will mention quickly, is you can change the label of the colours. As you can see from the above screen shot, I have changed Green to Green – Instagram. This means if you want to set a colour for a particular this, you can rename it so you know what that colour is for.
Do this as follows.
Click on Metadata > Colour Label Set > Edit. You will see the following options
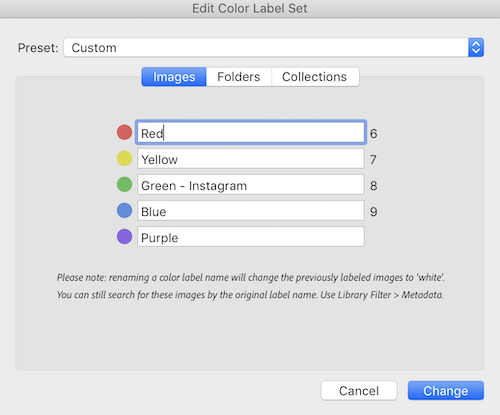
You can then add your own option to the colour. Currently, the only thing I use this for is any photos I post to Instagram, I colour Green. This though, is about to change, and I am going to utilise Collections more, which, we will discuss next.
Collections
Collections could be a great way of organising and managing your Photos in Lightroom. As 2021 progresses, I am definitely going to use Collections more.
there are a few different types of Collection you can set up, be we are going to concentrate on Smart Collections.
Basically, Smart Collections are like filters. You can assign certain criteria, and it will filter your photos based on the options you choose. Let’s pick a simple one for now.
We are going to assume that I want to see all my Flagged Photos from 2019.
Setting up Smart Collections
Here, in this Test Catalogue, in my 2019 folder you can see I have 10 photos. 5 of them are Flagged as Pick. 2 were deemed good enough for Instagram.

You can set up filters, or Smart Collections to automatically add the ones you Flag or Colour, so you can see them without having to apply filters in any given folder. This is really easy to do.
In the Left Panel, scroll to the bottom where it shows Collections, and click on the + sign, and then Create Collection Set.

This should bring up the following Window, where you can name your collection set, and make it part of another set, if required.

When you have created your new Collection Set, it will appear in the Collections Panel of the left side bar.
Next, Right click on this new Collection set, and choose Create Smart Collection.

You will then see the following window, where you can add all sorts of criteria, and it will bring back all the results that meet the chosen criteria.

I can’t choose for you what your Smart Collections should be. But if it helps, I will set a simple Smart Collection up now, to return all of my Flagged Photos, from 2019.

The Smart Collection is simply named, 2019 Flagged Photos. I have simply asked it to show me All of the photos in the Folder 2019 where the Pick Flag is Flagged.
If you remember above, I had 5 photos from the 2019 folder that were Flagged. This is the result.

Now, moving forward, any photo I flag from the folder 2019, will appear in this Collection Set Automatically. I could then set another Smart Collection up up for ones Highlighted Green, to show me all the Instagram photos.
Summary – Organising and Managing your Photos in Lightroom
There you have it. Organising and Managing your Photos in Lightroom doesn’t have to be arduous. This is how I manage my Lightroom library, and how I plan to improve it in 2021. It is super frustrating knowing there is a photo in your library, than you cannot locate and hopefully this guide will help me, and you,
There is a lot in the above that I will be expanding on, so don’t forget to subscribe to the newsletter, and head over to the YouTube channel for more great content.
Thanks again, and see you next time.
Rich


